Git,
Github, and Markdown
Alice McGrath || June 4, 2024
Outline
What are Git ,
GitHub , and Markdown ? Why are they
useful?
How to write using Markdown
syntax
An introduction to GitHub and how to use it for
collaboration
Git version control commands and workflows
1. Basics
Git -
open-source software for version controlGitHub - a
popular code repository for sharing and collaboratingMarkdown - a lightweight,
human-readable markup language
What does it do?
Version control!
Git keeps track of file changes and enables you to label them and
preserve multiple version histories of a project
Why use it?
Avoid file conflicts! Other collaboration/syncing
tools are not designed for code
It helps you test code, troubleshoot, or ‘undo’
changes
Be intentional: package your changes logically,
document and explain your work
What does it do?
It hosts code and enables users to manage collaboration on projects
(using Git for version control).
Why use it?
Widely used to develop and share open-source tools
and datasets
Free web hosting with static site builder (GitHub Pages )
Makes collaboration visible and transparent
What does it do?
It’s a markup language: it encodes information in plain-text to be
machine readable. Markdown uses the file extension .md
Why use it?
Sustainable, open-source word-processing
Easier to read and write than HTML & other
markup languages
Can be converted into any kind of document -
including presentations like this one!
Used on many platforms (GitHub, Notion, Obsidian,
Roam…)
2. Using GitHub
We’ll take a tour of a repository for an open-source
word cloud generator
amueller/word_cloud
word cloud of US
constitution
Creating a repository
Create an empty repository on GitHub or import one
from your computer
Copy an existing repository (by
forking or using a template )
Add recommended files: a README.md for
documentation, a license and a .gitignore
Your turn
Create a repo from a
template
Navigate to the repo for this workshop: github.com/digbmc/git-hub-ws
Click on Use this template and
then Create a new repository
Give your repository a name and a description
Select ‘copy only main branch’
Your new repository has the same files and change
history, but not a tracked connection to the original
Editing content
Use the pencil icon to edit the README.md file
Add some text and save your work using the Commit
changes button
Change the commit message so that it describes your
changes, and
Select ‘commit directly to the main branch’ and click Commit
changes
3. Writing in Markdown
# First level heading
## Second-level heading
Paragraph with **bold** text and *italicized* text.
[This is linked text](www.myurl.com)

See this cheat
sheet for more markdown syntax.
Your Turn
Open Visual Studio Code
Create a new file (File > New File ) named
myfile.md
Open the file and write some content using markdown syntax: include
headers, images, and links
Save your file
On the left sidebar, right-click on the filename and select
Open Preview to see what your site looks like in
rendered markdown
Back in your browser, select Add file > Upload
files .
Drag and drop myfile.md into your repository
Don’t forget to add a commit message
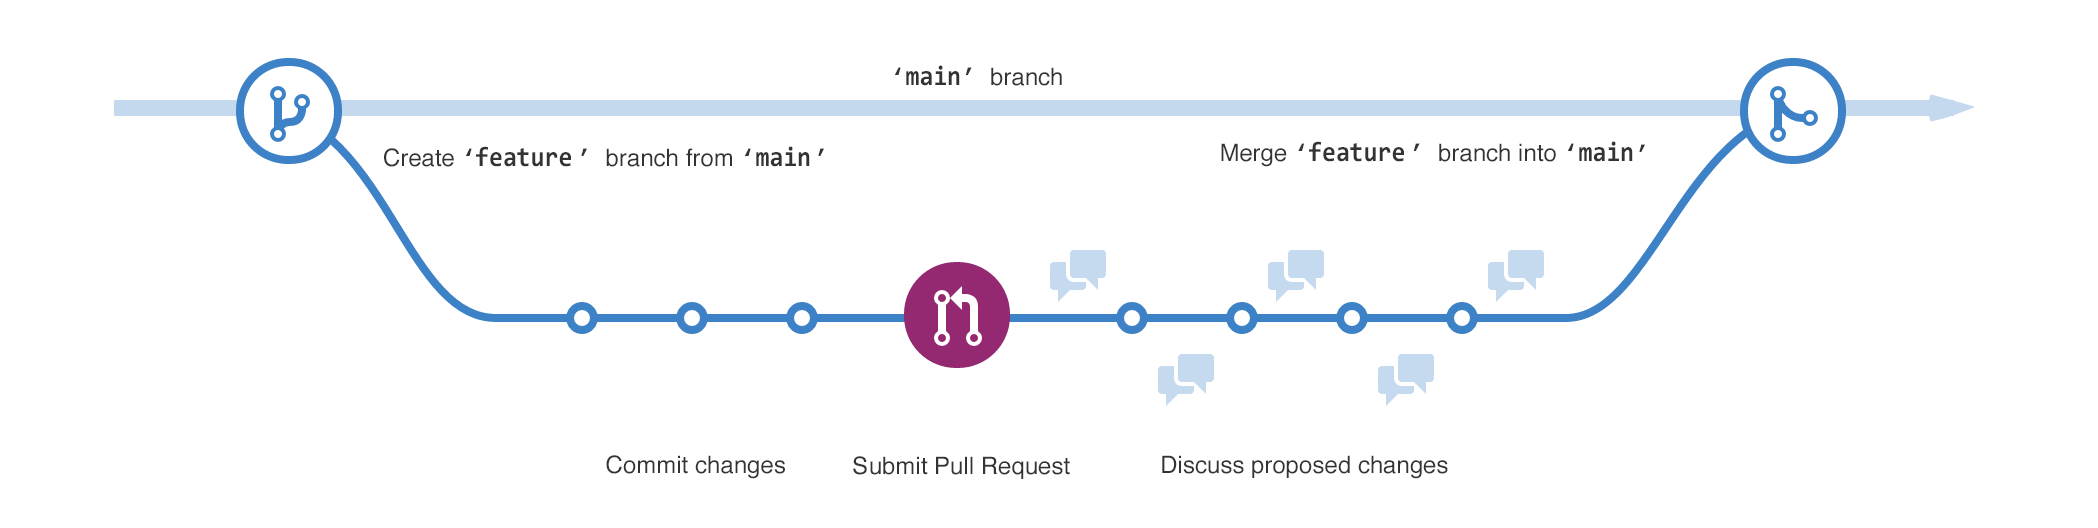
4. Branching & Collaboration
Branches make collaboration easier by avoiding file conflicts
Commit changes to a new branch that diverges from
the main tree
Open a pull request to propose your changes
A team member reviews the pull request and discusses any
conflicts
Merge pull request: incorporate your changes into the main
branch
Your turn
Make another edit to your README.md file and
Commit it
Commit your change and add a
commit messageThis time select ‘create a new branch & open a
pull request’
Review & merge the pull
request
Look at your repository’s commit history
5. Local vs. Remote
Git enables you to have a local version of your
repository (on your computer) that is connected to the
remote (on ‘the cloud’) version.
By pulling commits from remote to local and
pushing commits from local to remote, you can control
the version history of both.
Installing Git
GitHub Desktop
Install a GUI client (an application with a graphical user interface)
such as GitHub desktop
Command line
Install Git here to use it
from the command line and/or use Git/GitHub features for VS
Code or another text editor
Configuration
GitHub Desktop
Open GitHub Desktop
From the top menu, under GitHub Desktop: Preferences > Accounts
> GitHub.com > Sign in
Sign in using your GitHub account credentials
Visual Studio Code
In VS code, navigate to the Source Control tab
You will be prompted to sign in to GitHub and authorize VS code with
your github account
see
also these instructions
Command line
Open a terminal window and type:
git config --global user.name "Firstname Lastname"
When you push, you will have to authenticate to github with a personal
access token
Clone the repository
Create a folder on your computer for workshops (if you don’t already
have one)
Visual Studio Code
In the Source Control tab, you will see an option
to Clone a repository
Select the new repository you have created
GitHub Desktop
Navigate to your new repository on github. From the ‘Code’ dropdown
menu:
Select ‘Open with GitHub Desktop’ and put it in the workshop
folder
Open the folder in VS Code (add folder to workspace)
Command line
Navigate to your new repository on github. From the ‘Code’ dropdown
menu:
Copy the url ending with .git. In your terminal, navigate to the
workshop folder and type git clone [git url]
Open the folder in VS Code (add folder to workspace)
6. Git Versioning process
Git workflow
Add or Stage changes
git add newfile.md
After you create a new file or save changes, staging tells Git to
track the file.
commit
git commit -m "message describing my changes"
Package your staged changes and label them for others’ awareness
pull
git pull
Update your local repo with any changes that have been committed to
the remote repo
push
git push origin main
Send your changes to the remote repository and publish them on
GitHub
Other commands
git status - see if you have staged
changesgit branch branchname - create a new
branchgit checkout branchname - switch to
another branch
Your turn
Make some changes and save the files.
Stage your changes:
In VS Code, use the plus icon to stage a change
git add --all
Commit your changes, with a message
Enter a message into the ‘message’ field and select ‘Commit’
git commit -m "message"
After a few commits, push to the remote repo:
“Publish Branch”
git push origin main
xkcd comic on Git
Remember, it’s ok to mess up! Source: xkcd
Vocabulary
Repo or repository (n.)
A discrete project on GitHub that contains a set of files, a change
history, and a set of contributors. (E.g. this one )
Fork (v.)
To copy a repo’s files and version history to a new one with its own
settings (preserves connection with original repo but doesn’t
interfere).
Clone (v.)
To download a local copy of a repo on GitHub with a tracked connection
to the remote repo.
Local (adj.)
On your computer.
Remote (adj.)
On someone else’s computer (aka ‘the cloud’).
Branch (n.)
A version of a repository with its own history. Branches can be created
for a unique set of changes and later merged with the main
branch to avoid file conflicts.
Commit :(v.) To package and label a discrete set of
changes to a repository. :(n.) A set of changes that has been committed.
Thanks!
Questions?
Email digitalscholarship@bmc
Message me on Teams
Credits
Slides creating using Reveal.js and Pandoc
Content by Alice McGrath and licensed cc-by-nc-sa